From Valve Developer Community
Jump to: navigation, search
![]()
![]()
![]()
… ![]()
Вы получите эту ошибку, если в папке bin вашего мода нет библиотек; это так же происходит, если у вас не замонтирована папка sourcetest в gameinfo.txt, если вы используете appid 215.
Исправление
Эти изменения в <MOD FOLDER>/gameinfo.txt.
После
Game hl2
Добавьте
Game sourcetest
Retrieved from «https://developer.valvesoftware.com/w/index.php?title=Cannot_load_library_client:ru&oldid=269031»
Categories:
- Russian
- Source SDK FAQ:ru
Hidden category:
- Pages using Lang
by Milan Stanojevic
Milan has been enthusiastic about technology ever since his childhood days, and this led him to take interest in all PC-related technologies. He’s a PC enthusiast and he… read more
Updated on April 26, 2022
- Engine error: Could not load library client is an annoying message that can affect Steam and your favorite games.
- In order to fix this problem you should temporarily disable your antivirus.
- Move your Steam installation to another location by following our guide below.
- You can also repair the Steam client service from the Command Prompt.
XINSTALL BY CLICKING THE DOWNLOAD FILE
Fortect is a system repair tool that can scan your complete system for damaged or missing OS files and replace them with working versions from its repository automatically.
Boost your PC performance in three easy steps:
- Download and Install Fortect on your PC.
- Launch the tool and Start scanning
- Right-click on Repair, and fix it within a few minutes
- 0 readers have already downloaded Fortect so far this month
Millions of gamers use Steam on a daily basis to play their favorite games, but some users have reported Engine error: Could not load library client error when they try to launch their favorite games on Steam, so today we’re going to show you how to fix this error on Windows 10.
What is Engine Error: Could Not Load Library Client And How To Fix It On Windows 10
Speaking of this error, users reported the following issues:
- Could Not Load Library Client CS GO, Left 4 Dead 2, HL2 mod, Goldeneye Source, CS Source, Wolfenstein, GMod – This error can affect many games such as Global Offensive, Garry’s Mod, Wolfenstein and many others. If you’re having this problem, be sure to check the integrity of the game cache of the affected games.
- Could Not Load Library Client Try restarting – Sometimes you might encounter this error message on your PC. If that happens, be sure to restart Steam using Task Manager.
- Could Not Load Library Client w3btrv7.dll – If you encounter this error on your PC, the problem is related to the missing files, so you might have to install the missing components to fix this error.
- Could Not Load Library Client Steam – As previously mentioned, this error message usually occurs when using Steam. However, you should be able to fix the problem by using one of our solutions.
According to reports, “Engine error: Could not load library” affects only Valve’s games, such as Counter-Strike: Global Offensive or Dota 2, making your favorite game unplayable, so what can you do to fix this problem?
1. Download Microsoft Visual C++ 2010 Service Pack 1 Redistributable
If you’re getting Engine error: Could not load library client error, it might be that some Visual C++ Redistributable files are missing on your computer, and you can download all the necessary files from here. Just remember to install both x86 and x64 version if you’re running a 64-bit version of Windows 10.
2. Temporarily disable your antivirus
If you’re encountering Engine Error: Could Not Load Library Client message on your PC, the cause might be related to your antivirus. To fix this issue, be sure that the Steam directory is added to the exclusion list in your antivirus.
If that doesn’t help, you might have to temporarily disable your antivirus and check if that solves the problem. In case the issue still persists, you might have to uninstall your antivirus.
You can do that from Windows Settings, but we advise you use a dedicated utility that will uninstall your antivirus and remove its corresponding files and registry entries.
Removing any trace of an application when you reinstall ensures that there’s n risk of getting similar errors in the future. It will also make it easier for you if you want to reinstall it in the future.
For this job, we recommend you use CCleaner because it is a very simple to use utility that embodies a powerful yet simple uninstaller that lets you remove apps in just a few clicks.
It also includes a registry cleaner as well as a junk file cleaner. It is safer to use it than to try to manually detect leftover files. The registry utility includes a backup option that you can use to make sure everything goes smoothly.
Some PC issues are hard to tackle, especially when it comes to missing or corrupted system files and repositories of your Windows.
Be sure to use a dedicated tool, such as Fortect, which will scan and replace your broken files with their fresh versions from its repository.
⇒ Get CCleaner
3. Restart Steam
If “Engine error: Could not load library client” error is giving you trouble, try restarting Steam. Make sure that you turn off Steam completely, you can even check with Task Manager if the Steam is running. After turning off Steam completely, start it once again to see if the problem has been resolved.
4. Move your Steam installation
If the problem persists, and Steam is installed to a location that contains letters or symbols that are not in the English alphabet, you might have to move your Steam installation. Don’t worry, your Steam games will be saved, and if everything goes well you won’t have to download them again.
Before we start moving your Steam installation, make sure that you know your username and password, because you’ll need it to access Steam later.
- Make sure that Steam isn’t running.
- Go to the Steam installation directory. By default it should be:
- C:Program FilesSteam
However, this location might be different on your computer.
- C:Program FilesSteam
- Delete all the files and folders except for the SteamApps folder (this is where your downloaded games are stored) and Steam.exe.
- Move these two files to another location.
- Launch Steam.exe from a new location, and log in to your account.
Steam will now update, and you’ll be able to play your favorite games again. In addition, it wouldn’t be a bad idea to verify game cache files. If you have any issues after moving your Steam games to a new directory you should delete Steam data from your registry. To do that follow these instructions:
- Go to your Steam directory and delete all files from it, except for the SteamApps folder. It’s advised that you move the SteamApps folder to a different location because you’ll need it later.
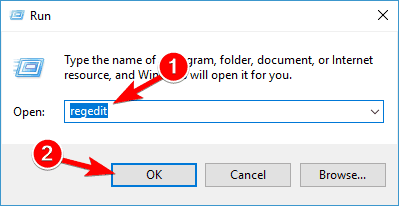
- Now, start the Registry Editor. You can start it by pressing Windows Key + R on your keyboard and typing regedit in the Run dialog. After typing regedit click OK or press Enter.
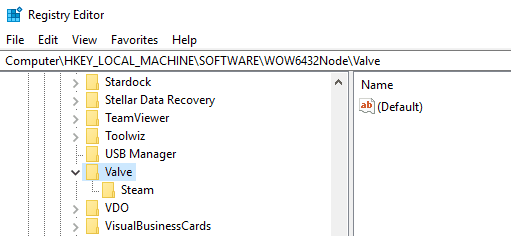
- When Registry Editor opens navigate to the following key in the left pane:
- HKEY_LOCAL_MACHINESOFTWAREValve (if you use a 32-bit version of Windows 10)
- HKEY_LOCAL_MACHINESOFTWAREWow6432NodeValve. (if you use a 64-bit version of Windows 10)
- Right-click on the Valve key and choose Delete.
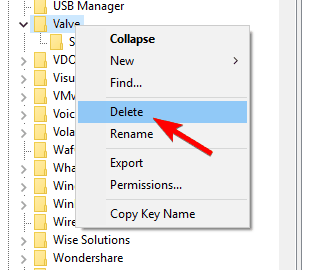
- Close Registry Editor.
- Now go to Steam’s website and download the new Steam client.
- Install it, and move your SteamApps folder to it.
- After doing that, log in to Steam. It’s also advised that you verify the game cache of the games you want to run.
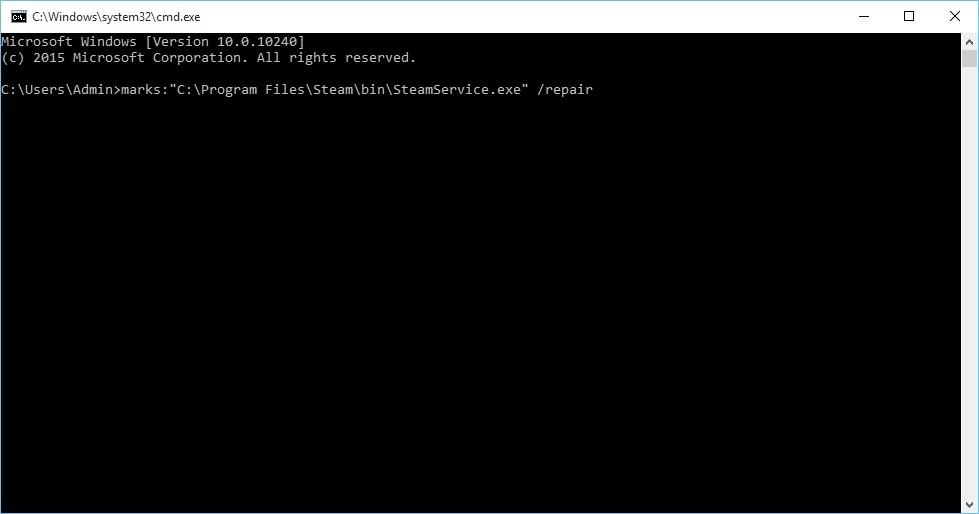
5. Repair the Steam Client Service
- Make sure that Steam isn’t running.
- Start Command Prompt as administrator. To do that, press Windows Key + X to open the Win + X menu and choose Command Prompt (Admin) from the menu.
- When Command Prompt starts paste the following:
- marks:”C:Program FilesSteambinSteamService.exe” /repair
- marks:”C:Program FilesSteambinSteamService.exe” /repair
- Remember to change the location between the quotes, so that it matches your Steam installation directory.
- Press Enter to run it. This might take a while, but after the process is completed, you should get a message saying “Steam Client Service repair completed”.
- After the process is completed, close Command Prompt and restart your computer.
6. Verify the game cache
To verify the game cache of the game that gives you Engine error: Could not load library client error you need to do the following:
- Open Steam.
- Right-click the game that doesn’t work and choose Properties.
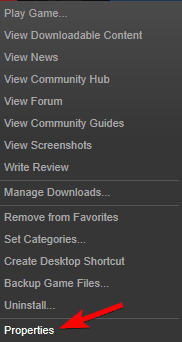
- Next, navigate to the Local Files tab and click Verify Integrity Of Game Files.
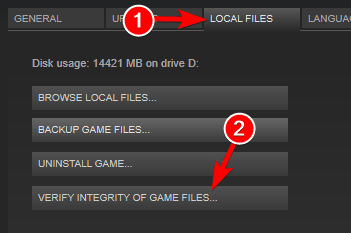
- This process might take a while, so be patient.
- After the verification process has been completed, try running the game again.
7. Delete bin folder
If a certain game is giving you this error, you might want to delete its bin folder. Sometimes some .dll files can move to the wrong locations, so let’s try to delete the bin folder. We have to warn you, sometimes by deleting a game folder you can cause damage to your game, and if that happens you might have to download the game again.
In our example use used Garry’s mod, but this could be any other game that isn’t working properly. To delete the bin folder follow these instructions:
- Navigate to the following folder:
- C:Program FilesSteamSteamAppsyour_usernamegarrysmod
- Find the bin folder and delete it. After deleting the folder, try running the game again.
- If the problem persists go to the following folder:
- C:Program FilesSteamSteamAppsyour_usernamegarrysmodgarrysmod
- Find the bin folder and delete it
- After you have deleted the bin folder, try to start the game again.
- If the problem still isn’t fixed go to:
- C:Program FilesSteamSteamAppsyour_usernamegarrysmod
and delete all folders and files except the garrysmod folder.
- C:Program FilesSteamSteamAppsyour_usernamegarrysmod
- Try to start the game again.
8. Change the gameinfo.txt file
This solution applies to game mods, so if you’re having any problems with mods, try the following steps:
- Go to mod folder and open gameinfo.txt file.
- Find the following line:
- Game hl2 and change it to:
- Game sourcetest
- Save the changes and try running the mod again.
As you can see, Engine error: Could not load library client error can create some trouble, but in most cases, you can fix it by downloading Download Microsoft Visual C++ 2010 Service Pack 1 Redistributable files.
- 0xc184c00f Error Code: How to Fix This GeForce Issue
- WordPad Not Opening? 4 Ways to Fix it
- Error Code e84 on Steam: How to Fix it
- Inspect Element Not Working on Discord? How to Fix it
- Diablo 4: What’s the best class and what should you play?
![]()
Миллионы геймеров ежедневно используют Steam, чтобы играть в свои любимые игры, но некоторые пользователи сообщают об ошибке «Ошибка движка: клиент библиотеки не загружается», когда они пытаются запустить свои любимые игры в Steam , поэтому сегодня мы собираемся показать Вы, как исправить эту ошибку на Windows 10 .
Что такое ошибка Engine: не удалось загрузить клиент библиотеки и как ее исправить в Windows 10
Ошибка Engine: Could Not Load Library Client — раздражающая ошибка, которая может повлиять на Steam и ваши любимые игры. Говоря об этой ошибке, пользователи сообщили о следующих проблемах:
- Не удалось загрузить библиотечный клиент CS GO, Left 4 Dead 2, мод HL2, Goldeneye Source, CS Source, Wolfenstein, GMod — эта ошибка может повлиять на многие игры, такие как Global Offensive, Garry’s Mod, Wolfenstein и многие другие. Если у вас возникла эта проблема, обязательно проверьте целостность игрового кэша затронутых игр.
- Не удалось загрузить библиотечный клиент Попробуйте перезапустить — иногда вы можете столкнуться с этим сообщением об ошибке на вашем ПК. Если это произойдет, обязательно перезапустите Steam с помощью диспетчера задач.
- Не удалось загрузить библиотечный клиент w3btrv7.dll — если вы столкнулись с этой ошибкой на вашем компьютере, проблема связана с отсутствующими файлами, поэтому вам может потребоваться установить недостающие компоненты, чтобы исправить эту ошибку.
- Не удалось загрузить библиотеку клиента Steam — Как уже упоминалось ранее, это сообщение об ошибке обычно возникает при использовании Steam. Тем не менее, вы должны быть в состоянии решить проблему, используя одно из наших решений.
Согласно сообщениям, «Ошибка движка: Не удалось загрузить библиотеку» затрагивает только игры Valve, такие как Counter-Strike: Global Offensive или Dota 2 , что делает вашу любимую игру неиграбельной, так что вы можете сделать, чтобы решить эту проблему?
Решение 1. Загрузите Microsoft Visual C ++ 2010 с пакетом обновления 1 (SP1).
Если вы получили сообщение об ошибке Engine: не удалось загрузить ошибку клиента библиотеки , возможно, на вашем компьютере отсутствуют распространяемые файлы Visual C ++, и вы можете загрузить все необходимые файлы отсюда . Просто не забудьте установить версию для x86 и x64, если вы используете 64-битную версию Windows 10 .
Решение 2. Временно отключите антивирус
Если вы сталкиваетесь с сообщением об ошибке Engine: Could Not Load Library Client на вашем компьютере, возможно, причина связана с вашим антивирусом. Чтобы устранить эту проблему, убедитесь, что каталог Steam добавлен в список исключений вашего антивируса.
Если это не поможет, возможно, вам придется временно отключить антивирус и проверить, решает ли это проблему. Если проблема не устранена, возможно, вам придется удалить антивирус.
Для этого лучше всего использовать специальный деинсталлятор . Многие антивирусные компании предлагают деинсталляторы для своего программного обеспечения, поэтому обязательно загрузите антивирус для своего антивируса.
Чтобы быть в безопасности, рекомендуется использовать специальный деинсталлятор , чтобы вы удалили все файлы и записи реестра, связанные с вашим антивирусом. Мы рекомендуем вам попробовать IOBit Uninstaller и Revo Uninstaller .
Удаление антивируса обычно решает эту проблему, но если вы хотите остаться защищенным, рекомендуется переключиться на другое антивирусное решение. Антивирусные инструменты, такие как Bitdefender , BullGuard и Panda Ant i virus, являются отличным выбором, поскольку они оснащены функцией игрового режима, которая предотвращает взаимодействие антивируса с игровыми сеансами.
- ЧИТАЙТЕ ТАКЖЕ: Я не могу открыть Steam в Windows 10: Как я могу решить эту проблему?
Решение 3 — Перезапустите Steam
Если ошибка «Ошибка двигателя: Не удалось загрузить клиент библиотеки» вызывает проблемы, попробуйте перезапустить Steam. Убедитесь, что вы полностью выключили Steam, вы даже можете проверить с помощью диспетчера задач, работает ли Steam. После полного отключения Steam запустите его еще раз, чтобы увидеть, была ли проблема решена.
Решение 4 — перенесите установку Steam
Если проблема не устраняется и Steam устанавливается в папку, содержащую буквы или символы, которые не в английском алфавите, возможно, вам придется перенести установку Steam. Не волнуйтесь, ваши игры в Steam будут сохранены, и если все пойдет хорошо, вам не придется загружать их снова.
Перед тем, как мы начнем перемещать вашу установку Steam, убедитесь, что вы знаете свое имя пользователя и пароль, потому что он понадобится вам для доступа к Steam позже.
- Убедитесь, что Steam не работает.
- Перейдите в каталог установки Steam. По умолчанию это должно быть:
- C: Program Files Steam
Однако это местоположение может отличаться на вашем компьютере.
- C: Program Files Steam
- Удалите все файлы и папки, кроме папки SteamApps (здесь хранятся загруженные вами игры) и Steam.exe .
- Переместите эти два файла в другое место.
- Запустите Steam.exe из нового места и войдите в свою учетную запись.
Steam обновится, и вы снова сможете играть в свои любимые игры. Кроме того, было бы неплохо проверить файлы кеша игры. Если у вас возникнут проблемы после переноса ваших игр Steam в новый каталог, вы должны удалить данные Steam из своего реестра. Для этого следуйте этим инструкциям:
- Перейдите в каталог Steam и удалите из него все файлы, кроме папки SteamApps . Рекомендуется переместить папку SteamApps в другое место, потому что она понадобится вам позже.
- Теперь запустите редактор реестра . Вы можете запустить его, нажав Windows Key + R на клавиатуре и набрав regedit в диалоговом окне «Выполнить» . После ввода regedit нажмите OK или нажмите Enter .

- Когда откроется редактор реестра, перейдите к следующему ключу на левой панели:
- HKEY_LOCAL_MACHINE SOFTWARE Valve (если вы используете 32-разрядную версию Windows 10)
- HKEY_LOCAL_MACHINE SOFTWARE Wow6432Node Valve . (если вы используете 64-битную версию Windows 10)

- Щелкните правой кнопкой мыши на ключе Valve и выберите « Удалить» .

- Закройте редактор реестра .
- Теперь перейдите на сайт Steam и загрузите новый клиент Steam.
- Установите его и переместите в него папку SteamApps .
- После этого войдите в Steam. Также рекомендуется проверить кэш игр, в которые вы хотите играть.
- ЧИТАЙТЕ ТАКЖЕ: Как исправить ошибку AppHangB1 в Steam
Решение 5 — Восстановить службу клиента Steam
- Убедитесь, что Steam не работает.
- Запустите командную строку от имени администратора . Для этого нажмите клавиши Windows + X, чтобы открыть меню Win + X, и выберите в меню командную строку (Admin) .

- Когда командная строка запускается, вставьте следующее:
- отмечает: «C: Program Files Steam bin SteamService.exe» / ремонт

- отмечает: «C: Program Files Steam bin SteamService.exe» / ремонт
- Не забудьте изменить расположение между кавычками, чтобы оно совпадало с каталогом установки Steam.
- Нажмите Enter, чтобы запустить его. Это может занять некоторое время, но после завершения процесса вы должны получить сообщение «Ремонт клиентской службы Steam завершен» .
- После завершения процесса закройте командную строку и перезагрузите компьютер.
Решение 6 — Проверьте кеш игры
Чтобы проверить игровой кеш игры, который выдает ошибку Engine: не удалось загрузить ошибку клиента библиотеки, вам необходимо сделать следующее:
- Откройте Steam .
- Щелкните правой кнопкой мыши игру, которая не работает, и выберите « Свойства» .

- Затем перейдите на вкладку « Локальные файлы» и нажмите « Проверить целостность игровых файлов» .

- Этот процесс может занять некоторое время, так что наберитесь терпения.
- После завершения процесса проверки попробуйте снова запустить игру.
Решение 7 — Удалить папку bin
Если какая-то игра выдает эту ошибку, вы можете удалить ее папку bin. Иногда некоторые DLL-файлы могут перемещаться в неправильные места, поэтому давайте попробуем удалить папку bin. Мы должны предупредить вас: иногда, удалив папку с игрой, вы можете повредить игру, и в этом случае вам, возможно, придется загрузить игру снова.
- ЧИТАЙТЕ ТАКЖЕ: Как установить / перенести игры Steam на SSD
В нашем примере используется мод Garry, но это может быть любая другая игра, которая не работает должным образом. Чтобы удалить папку bin, выполните следующие действия:
- Перейдите в следующую папку:
- C: Program Files Steam SteamApps your_username garrysmod
- Найдите папку bin и удалите ее. После удаления папки попробуйте снова запустить игру.
- Если проблема сохраняется, перейдите в следующую папку:
- C: Program Files Steam SteamApps your_username garrysmod garrysmod
- Найдите папку bin и удалите ее
- После того, как вы удалили папку bin, попробуйте запустить игру снова.
- Если проблема не устранена, перейдите по ссылке:
- C: Program Files Steam SteamApps your_username garrysmod
и удалите все папки и файлы, кроме папки garrysmod .
- C: Program Files Steam SteamApps your_username garrysmod
- Попробуйте запустить игру снова.
Решение 8 — Измените файл gameinfo.txt
Это решение применимо к игровым модам, поэтому, если у вас возникли проблемы с модами, попробуйте выполнить следующие действия:
- Перейдите в папку mod и откройте файл gameinfo.txt .
- Найдите следующую строку:
- Игра HL2 и изменить его на:
- Исходный код игры
- Сохраните изменения и попробуйте запустить мод снова.
Как видите, ошибка Engine: не удалось загрузить библиотеку. Ошибка клиента библиотеки может создать некоторые проблемы, но в большинстве случаев это можно исправить, загрузив файлы Microsoft Visual C ++ 2010 с пакетом обновления 1 (SP1) и распространяемые файлы.
Примечание редактора : этот пост был первоначально опубликован в феврале 2016 года и с тех пор был полностью переработан и обновлен для обеспечения свежести, точности и полноты.
ЧИТАЙТЕ ТАКЖЕ:
- Исправлена ошибка интерфейса Intel Engine Engine для Windows 10
- Исправлено: Windows 10 App Store ошибка 0x803f7003
- Как исправить игру Steam, которая мгновенно закрывается
- ИСПРАВЛЕНИЕ: Код ошибки драйвера NVidia 3 в Windows 10
- Как использовать команду «steam: // flushconfig» в Windows 10
If you encounter the Engine Error: Could not load library client on Steam on your Windows 11 or Windows 10 computer, then this post is intended to help you. In this post, we will offer the most suitable solutions Steam users can try to successfully resolve this issue.
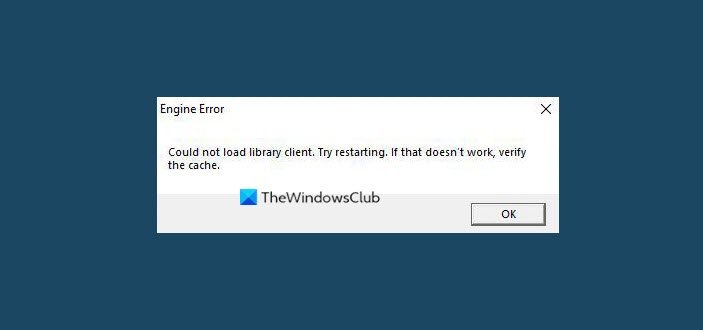
When you encounter this issue, you’ll receive the following full error message;
Engine Error
Could not load library client. Try restarting. If that doesn’t work, verify the cache.
If you’re faced with this issue, you can try our recommended solutions below in no particular order and see if that helps to resolve the Engine Error: Could not load library client issue on your Windows 11/10 PC.
- Restart Steam
- Download and install the latest Microsoft Visual C++ Redistributable
- Temporarily disable Security Software
- Move Steam installation
- Repair Steam Client Service
- Verify game file/cache integrity
- Uninstall and reinstall Steam
- Perform System Restore
Let’s take a look at the description of the process involved concerning each of the listed solutions.
1] Restart Steam
As indicated on the error prompt, you can restart Steam by killing all running instances of Steam via Task Manager, and then restarting your system as well, and on boot, relaunch Steam once again – if the Engine Error: Could not load library client issue isn’t resolved, try the next solution.
2] Download and install latest Microsoft Visual C++ Redistributable
This solution requires you to download and install latest Microsoft Visual C++ Redistributable on your Windows 11/10 gaming PC and see if the issue is resolved. If not, try the next solution.
3] Temporarily disable Security Software
This solution requires you to temporarily disable any third-party security software.
This largely depends on the security software you have installed. Refer to the instruction manual. Generally, to disable your antivirus software, locate its icon in the notification area or system tray on the taskbar (usually in the lower right corner of the desktop). Right-click the icon and choose the option to disable or exit the program.
You may also whitelist Steam and make sure Steam is allowed through your Firewall. If you’re running a dedicated third-party firewall, refer to the instruction manual.
4] Move Steam installation
Before we start moving your Steam installation, make sure that you know your username and password, because you’ll need it to access Steam later.
To move Steam installation on your Windows PC, do the following:
- Make sure that Steam isn’t running by right-clicking the icon on system tray and select Quit/Exit.
- Go to the Steam installation directory. By default it should be:
C:Program FilesSteam
- Delete all the files and folders except for the SteamApps folder (this is where your downloaded games are stored) and Steam.exe.
- Now, move these two folders with their contents to another location on your local drive.
- Launch Steam.exe from a new location, and log in to your account.
Steam will now update, and the issue should be resolved. If not, proceed with the next solution.
5] Repair Steam Client Service
To repair the Steam Client Service on your Windows 11/10 gaming rig, do the following:
- Press Windows key + R to invoke the Run dialog.
- In the Run dialog box, type cmd and then press CTRL + SHIFT + ENTER to open Command Prompt in admin/elevated mode.
- In the command prompt window, type or copy and paste the command below and hit Enter:
marks:”C:Program FilesSteambinSteamService.exe” /repair
Once the command executes successfully, you should get a message saying “Steam Client Service repair completed”. After the process is completed, close Command Prompt and restart your computer.
6] Verify game file/cache integrity
If there is an issue with the installation of the game, you’ll get this error. In this case, as indicated on the error prompt to verify the cache, you can use Steam’s built-in utility to verify the integrity of the game’s files. Here’s how:
- Open Steam client.
- Click the Library tab to view your games.
- Now, right-click the problematic game and select Properties.
- In the pop-up window, go to the Local Files tab.
- Click the Verify Integrity of Game Files button.
Depending on the size of the game, this process may take a while; so be patient and wait for Steam to validate the game’s files – Steam will automatically reacquire files that failed the validation check.
7] Uninstall and reinstall Steam
This solution requires you to uninstall Steam client (preferably, use third-party software uninstaller), clear Steam AppData folder contents, reboot PC, and then download and reinstall the latest version of Steam app on your Windows 11/10 PC.
To clear/delete Steam AppData folder contents, do the following:
- Press Windows key + R to invoke the Run dialog.
- In the Run dialog box, type the environment variable below and hit Enter.
%appdata%
- At the location, find (you may need to show hidden files/folders) the Steam folder.
- Right-click the folder and select Delete. Confirm any additional prompts.
- Exit File Explorer.
8] Perform System Restore
If you noticed that the error started to occur recently, it’s entirely possible that the issue was facilitated by a change that your system has gone through recently.
At this point, if none of the above solutions worked for you, you can restore your system to an earlier point when the system was working correctly without throwing the Steam engine error.
Any of these solutions should work for you!
How do you fix an engine error in CS GO?
To fix an engine error in CS:GO, you can try the following: Video card driver – the First thing you need to take care of is your graphics card driver. Verify game cache. Often when you have crashes CS:GO, it’s recommended to check the cache of the game client Steam. Other solutions include lowering your graphics settings before entering the game through “Steam” by setting a lower screen resolution.
How do I fix a corrupted Steam save?
If you’re getting an error from Steam that says “corrupt content files”, you can follow these instructions to fix the issue: Verify your game cache. Right-click Rec Room in your Steam Library, go to the Local Files tab, and click “Verify Integrity of Game Files.” Then try to launch the game.
Hi all,
I am seeing some weird behaviour with my mod. Hopefully someone has ideas..
If I unpack a zip of my mod and try to run it, the game crashes before reaching the splash screen, with the error in the title: «Could not load library — client.dll» along with the path to steamapps/common/… (where the working client.dll file is located).
If I replace my client.dll with an older version that was released in 2006, it has the same error.
If I rename client.dll so there isn’t a client.dll present, the game reaches the splash screen without error.
If I unzip my mod on a system that has previously installed an older version of the mod (using the installshield exe provided), the new DLLs work. I still don’t know what the difference is to cause this, so I’m trying to just look at the problem ignoring this..
There are lots of google results for this, but they are for source mods and pre-steam versions of half-life. Any suggestions?
Not sure — maybe file permissions?
Is there any difference in the old and new versions’ liblist.gam files? I think there a couple of client.dll-related keys that can be set.
The new liblist has a different version key and adds the ‘edicts’ key to prevent an awful crash.
I tried using the old liblist as well, with no luck.
I don’t think it should be file permissions either — if I’ve already installed the old version, the new files are loaded just fine by hl. As I say, I still can’t figure out what the old installer is doing to avoid this (that just unzipping the files is not).
Hm, any differences in the various .cfg files?
And if you do a symbol dump on the client.dll files do they both export the same things? Probably a long shot as I think the engine will be specific if you’re not exporting an interface, but it might be worth a check.
Also, maybe try with a debug/release client.dll instead.
I have wondered if it’s something in the way I build. Definitely tried both debug/release profiles, no luck there..
The weird thing is my DLLs can work (but only if you have run the installshield exe from 2006 to set up the old version). If I just paste in the DLLs from the old installer (without running it), I get the same error. I guess I need to see what the installer does (other than paste files) because it seems important? Hrmmm.
Now that is odd. Is the .dll from the installer identical to copy+pasted .dll (if you compare file sizes, contents and so on)?
I’ve been experimenting some more..
If I paste the new version over the old one on a Windows XP virtual machine, it doesn’t work. Nothing seems to make my new binaries work on XP (and it seems like the installer isn’t related, thank god!). They work on Windows 7..
It feels like this is something about my binaries/build process, as you were thinking. Can’t quite place it yet but I’ll keep looking..
And actually, without looking at symbol tables and stuff directly, you’re on to something.
-Only with the new binaries- I get these errors in the console:
Can’t find address: 647f385a
Can’t find address: 647f12d0
Can’t find address: 647f385a
Can’t find address: 647f12d0
…
Must be something we aren’t exporting, that the old ones are. Maybe it can’t run without these functions on XP but it can on W7? Something like that?
More on the same point:
If I build with the source code from 2006 and my current build process, I get the exact same behaviour (missing functions on W7, startup crash on XP). So it’s down to the build process now.
Are there guidelines somewhere about this so I don’t have to just go and use some random visual studio version and project file?
I would have though the Visual Studio project was set up correctly — I guess you haven’t gone and fiddled with any settings?
I think I’ve seen a similar error to the «Can’t find address», but in the server .dll — I think I’d done something wrong with LINK_ENTITY_TO_CLASS, though as I think more those may have been debug messages. Is «Can’t find address» yellow or red? And if you search through the code is it there or in the engine? Maybe it’s something to do with the message handler export macros?
@johnstt
I don’t know about the can’t find address errors, maybe you are having two different problems.
But appart from that, what is your project setting for Configuration Properties -> C/C++ -> Code Generation -> Runtime Library?
It should be Multi-threaded (/MT) for Release and Multi-threaded Debug (/MTd) for Debug builds. At least unless you want to deploy the otherwise required Microsoft DLL files on the target system.
Please don’t be angry if that idea is wrong 
If it was right, then please check your other project settings against these, to avoid other problems.
Yeah, I have that setting. Checking against that project file is still on my ‘to do’ list… hopefully I get to it soon and update this :}
Thanks!
Oh 
Are you using any other DLL files in your client.dll that might depend on some CRT DLL files? (I recall some mods did that).
Ooh, lots of awesome ideas. Thanks very much! I’ll try these shortly.
I highly recommend the usage of WinDbg as debugger for HL1 mods, when I was implementing the custom audio engine using FMOD Studio for ARRANGEMENT I had some memory leaks which VS2013’s debugger wasn’t helpful but WinDbg was.
Did you ever work it out?
Nope! Planning to work on it again soon.
I just tried patching visual studio with the link from ripieces. The binaries made with that magically seem to work! (without any setup after patching VS)
So I guess that’s good! Maybe I’ll learn the details later but this is great for now. Thanks, folks!
While that is great to hear, that could mean we will run into a lot of problems if we update the compiler version to 2012 or newer
Are you sure those "Can't find address: %08lxn" for debug builds are gone too? I would have thought those problems were unrelated.
@ripieces For our mod ARRANGEMENT, we use VS2013 compilers (v120) and we’ve got the same behaviour as if we were using VS2010 compilers (v100). XP compilers work too but they don’t make much difference, so theorically, VS2012 compilers (I presume v110) should also work.
However, I tried to use VS2015 compilers (v140) on my Windows 10 VM and they fail compiling the source code.
The ‘can’t find address’ stuff still happens, yeah.
Not sure about VS versions and stuff…it would be good to separate the build process from VS and just have some clear directions about a makefile and toolchain..
As said here you can enable _DEBUG build to find the functions that miss the CBASE_DLLEXPORT / EXPORT macro.
@johnstt
I managed to compile Half-Life’s source code in Visual Studio 2015 RC (community edition).
You can find it here. Deprecation warnings have been removed, so the code should proficiently build. It works for all projects with dmc, hl, ricochet.
I might attempt to fix utilities (utils.sln) and get them to build properly. In the case of mdlviewer, this could be replaced by Chumbalum Soft’s version.
Hope this helps.
I’m actually still looking at this because using the vs2012 patch didn’t help (not sure why I thought it did…)
@malortie : Have you tested if your half life client DLL works on Windows XP?
edit: Here is my current problem (to reiterate) — if I have my client.dll in the proper path, I get the error «could not load library client.dll». If I have no client.dll whatsoever, the game starts up (and crashes when you try to join a server, because it’s using the half-life client.dll)
So..what needs to be true about my client.dll for hl to load it? That’s probably what I really need to know (VS versions and so on don’t seem to be a direct cause).
You should really consider using WinDbg. It can even load symbols (.pdb) and source files, if you point it to the right directories (make sure to tick reload checkbox in case you are already attached to the process when setting them).
Are you sure you set v100 for both Release and Debug builds? Maybe you switched between release and debug and it’s not set? (S.th. like that happened to me once.)
Also I suppose you are using a Release build for Windows XP, because debug builds usually only work in own environment where the Visual Studio is installed (because of missing DLLs)?
Edit: forget about that previous paragraph, since you / Half-life are compiling static libraries, meaning Debug should work too.
@ripieces: Debug builds should always work for people who don’t have Visual Studio or any C/C++ related development/debugging stuff installed.
@johnstt: I recently had the Can't find address problem in my mod and I managed to fix it, please note that this solution may not work for you as your problem is related with the client DLL. But I’ll share my solution anyways because you may find it useful and others modders may came accross the same problem.
Here’s the context: I’m making a CTF (Capture The Flag) game mode for my mod, so I need to code 2 entities, the flag itself and the capture zone.
And now straight to the point, aka the Can't find address problem, how can it happen and how to fix it, take a look at this code which I simplified a lot so you can understand:
// CCTFFlag - Multiplayer Capture The Flag - Flag entity
class CCTFFlag : public CPointEntity
{
public:
    void Spawn( void );
    void EXPORT Think( void );
    void EXPORT Touch( CBaseEntity *pEntity );
};
LINK_ENTITY_TO_CLASS( info_ctf_flag, CCTFFlag );

void CCTFFlag::Spawn( void )
{
    SetThink( &CCTFFlag::Think );
    SetTouch( &CCTFFlag::Touch );
}

void CCTFFlag::Think( void )
{
    ALERT( at_console, "CCTFFlag::Thinkn" );
    pev->nextthink = gpGlobals->time + 0.1;
}

void CCTFFlag::Touch( CBaseEntity *pEntity )
{
    ALERT( at_console, "CCTFFlag::Touchn" );
}

// CCTFCaptureZone - Multiplayer Capture The Flag - Capture zone entity
class CCTFCaptureZone : public CBaseTrigger
{
public:
    void Spawn( void );
    void EXPORT Touch( CBaseEntity *pEntity );
};
LINK_ENTITY_TO_CLASS( func_ctf_capture_zone, CCTFCaptureZone );

void CCTFCaptureZone::Spawn( void )
{
    SetTouch( &CCTFCaptureZone::Touch );
}

void CCTFCaptureZone::Touch( CBaseEntity *pEntity )
{
    ALERT( at_console, "CCTFCaptureZone::Touchn" );
}
When I wrote this, I told myself: «It will be fine», so I pressed the «Build solution», and no errors/warnings were shown, good so far. Then I start my mod, start WinDBG, attach WinDBG to hl.exe, start my local CTF server and I had no Think related spam for CCTFFlag. I tried to touch a CCTFCaptureZone and nothing. I opened the console and took a look a bit after the server started and I saw the Can't find address lines.
After 20 minutes of raging, tweaking something here, tweaking some there, I realize by looking 10 times at others entities within the same file (triggers.cpp), that all EXPORT had unique names, so I changed a little bit my code so it look like this:
// CCTFFlag - Multiplayer Capture The Flag - Flag entity
class CCTFFlag : public CPointEntity
{
public:
    void Spawn( void );
    void EXPORT CTFFlagThink( void );
    void EXPORT CTFFlagTouch( CBaseEntity *pEntity );
};
LINK_ENTITY_TO_CLASS( info_ctf_flag, CCTFFlag );

void CCTFFlag::Spawn( void )
{
    SetThink( &CCTFFlag::CTFFlagThink );
    SetTouch( &CCTFFlag::CTFFlagTouch );
}

void CCTFFlag::CTFFlagThink( void )
{
    ALERT( at_console, "CCTFFlag::CTFFlagThinkn" );
    pev->nextthink = gpGlobals->time + 0.1;
}

void CCTFFlag::CTFFlagTouch( CBaseEntity *pEntity )
{
    ALERT( at_console, "CCTFFlag::CTFFlagTouchn" );
}

// CCTFCaptureZone - Multiplayer Capture The Flag - Capture zone entity
class CCTFCaptureZone : public CBaseTrigger
{
public:
    void Spawn( void );
    void EXPORT CTFCaptureZoneTouch( CBaseEntity *pEntity );
};
LINK_ENTITY_TO_CLASS( func_ctf_capture_zone, CCTFCaptureZone );

void CCTFCaptureZone::Spawn( void )
{
    SetTouch( &CCTFCaptureZone::CTFCaptureZoneTouch );
}

void CCTFCaptureZone::CTFCaptureZoneTouch( CBaseEntity *pEntity )
{
    ALERT( at_console, "CCTFCaptureZone::CTFCaptureZoneTouchn" );
}
I had no more Can't find address and got my CCTFFlag::CTFFlagThink spam, also touches were detected, in other words: everything worked like a charm. Hope this little «story» will be useful to you or any other modder which has the same problem.
@JoelTroch thank you for the info about the function names having to be unique in the whole class hierarchy.
I think the reason for that is the pointer casting trickery here:
#define SetThink( a ) m_pfnThink = static_cast <void (CBaseEntity::*)(void)> (a)
However at the moment I am thinking that the Can't find address problems were completely unrelated to that!
I am not even sure if the EXPORT is required on those Think and Touch function, but honestly I don’t know right now. (I know Valve did it like that almost everywhere, but cannot find a reason for that right now.)
I am stupid, sorry. The EXPORT macro is required, at least for the Debug builds, I am not sure though under which conditions the engine will call in there.
Sorry for my lack of knowledge
@johnstt
@tschumann
@JoelTroch
@ripieces
Despite the fact that the following message is not related to client.dll loading, but since it concerns most users struggling with VS versions or still are using ulterior versions such as VS2010, I believe it would be better to let as many people be aware of the following:
As promised, I managed to fix source code related issues related to warnings/deprecate, except for CRT functions, as using CRT recommended functions would require certain tweaks in various files, such as extra arguments. In addition to this, the fix prevents typical warnings such as precision loss, unreferenced variables, already defined macros, and other warning seen in the current master branch from being triggered.
In short, no more required warning suppression to prevent compiler from generating warnings such as:
The POSIX name for this item is deprecated. Instead, use the ISO conformant name: …
To solve this, I created two files: warning.h;vstdlib.h in public/vstdlib. warning.h is to help setup preprocessors to enable or disable the fix, while vstdlib.h includes macros to make future POSIX transitions easier.
If you look into the current source engine build, you will notice Valve uses macros such as Q_strncpy, Q_memset, which are all defined in a particular file, which associates macros to C standard functions based on OS, build configuration.
The same procedure was applied here. I had to go through every C standard library functions call in both projects.sln and utils.sln and replace them with Q_* alternatives, which are associated
in public/vstdlib/vstdlib.h.
I also promised to give you a working solution for Visual Studio 2010.
Here is a link to my branch.
Note: I deleted my old branches (Do not worry, I made backups) to clean all the monolithic pull requests I’v made.
Before attempting to do other pull requests, I encourage you to take a look at the current one, which contains all fixes specified above.
Please, let me know what you think. I am always forward to improve my work as well as commit skills and I cannot think of better people than you to help point me in the right direction.
Hope it helps.
@malortie
Thank you for your good work.
I checked your changes and these are the things I noticed, that you might want to address in a further commit to the same branch:
- if you include
vstdlib/warnings.hin those files, then the definition of_CRT_SECURE_NO_WARNINGSshould not be required in the project files, since those headers already defined. Not sure about the_CRT_SECURE_NO_DEPRECATEdefine, maybe include that in warnings.h somehow too, if it is required at all? cl_dll/vgui_TeamFortressViewport.hand project files: what’s up with these VS_2010_FIX, VS_2010_FIX_POSIX, VS_2010_FIX_CRT macros, I think those are not required (just use the Q_* version)- you are not using filecopy.bat anymore in the projects, this will have an impact on Valve’s automated build process, due to the calling of the p4 command
- in
dmc/cl_dll/util.hyou didn’t include vstdlib.h and warnings.h. while this file might be a leftover and not used actually anywhere, you might still want to add those for consistency there (since you did it in the other files where the max / min /abs macros were present). (This list item is not that important, you can ignore it) - in
projects/vs2010/projects.slnyou introduced project dependencies, those are not necessary afaik, the projects should compile in any order! Maybe remove those dependencies again, please.
I didn’t compile that branch yet, but will do later, after you decided whether to address these list items above or not.
Edit:
PS: Sorry that I comment here, but you haven’t enabled issues feature in your repository.
@ripieces
Thank you for your response.
I fixed all points you mentioned and enabled issues feature in my repository. You should be able to comment on my branch.
Here is the link
The VS_2010_FIX macros were temporary macros used to locate modifications. I did not see the remaining ones, as they were not listed as part of the solution when I was doing Find/Replace in VS2010. I do apologize.
I restored filecopy.bat calls in Postbuild events, but still kept my additional manual copy, as I currently do not have perforce installed, which would result in build failure. Although DLLs build correctly, this would require users to manually copy files to their mod folder.
I finally have an answer to my root problem (cannot find client.dll etc).
It was nothing to do with my code, or visual studio, or whatever other stuff.
Apparently the game uses 2 DLLs that are put in Half-Life/ (before the mod path) by the old installer: cg.dll and cg_GL.dll (a graphics API thingy). If it doesn’t see those, it gives that totally unrelated error message about client.dll. The fact that the error message was SO misleading cost all of us a lot of time and I’m frankly really disappointed to be writing this.
So I guess we got a lot of insightful discussion out of this, but it’s sort of a letdown that the real answer was so dumb. Ah, well!
I’ve got the same problem when i start modding, i downloaded the source and opened projects.sln
file and pressed build,the build done successfully but when i tried to run the game i got «Could not load library client.dll».
so i used dependency walker and opened the client.dll file and there was one entry point with a red sign near to it called «GetMousePos@Surface@VGUI»,used to get the mouse position in Vgui surface or something ,even though the compiler didn’t complain and the linker didn’t issued unresolved external error,the weird thing is that my code and the client code dont make any call to this function to get mouse position but to «GetMousePosition» and «GetMousePos» functions
exported by the engine in APIProxy.h file, so i thought that the linker got confused and link against «GetMousePos» which located in «VGUI_Surface.h» Surface file ,so i simply and temporally turned
the function declaration in Vgui surface class into a comment and rebuild the solution and the red sign in dependency walker gone and the mod worked fine
Regarding the EXPORT macro: it’s required for save/restore. The save/restore code looks up the name of think/touch/blocked/use methods through the engine, which in turn looks them up using dllexport tables. It maps addresses to names and vice versa. If you’re making a singleplayer mod, you must include EXPORT on all such methods for it to work.
If you have the time you can separate the engine and game save/restore code and use TYPEDESCRIPTION to store this information instead, but that’s a lot of work.
ghost
mentioned this issue
Apr 28, 2019